How to set up Wi-Fi hotspot on iPhone
What is Wi-Fi Hotspot?
In today’s world, staying connected is of utmost importance, and having access to a reliable Wi-Fi connection can greatly enhance your productivity and convenience. However, there are times when finding a Wi-Fi network can be difficult or expensive. Thankfully, most smartphones, including the iPhone, have a built-in feature that allows you to create a Wi-Fi hotspot. In this blog post, we will guide you through the process of setting up a WiFi hotspot on your iPhone, enabling you to stay connected wherever you go.
How to Set up Wi-Fi Hotspot?
Note that the Wi-Fi hotspot service on iPhone is known as Personal Hotspot.
Follow this step-by-step guide:
Step 1: Ensure Your iPhone Supports Personal Hotspot
The Personal Hotspot feature is available on most iPhones, but it’s vital to confirm this before proceeding. Go to your iPhone’s settings and look for the “Personal Hotspot” option. If it’s present, you’re good to go; if not, your device may not support this feature, or you might need to update your iOS version.
Step 2: Enable Personal Hotspot
Now that you’ve confirmed your iPhone supports the Personal Hotspot feature, proceed to enable it. Head to the settings app, and you’ll find “Personal Hotspot” located in the main settings page, usually just below “Cellular.” Open the Personal Hotspot menu, and you will see a toggle switch named (Allow Others to join). Slide it to the right to turn on the hotspot functionality.
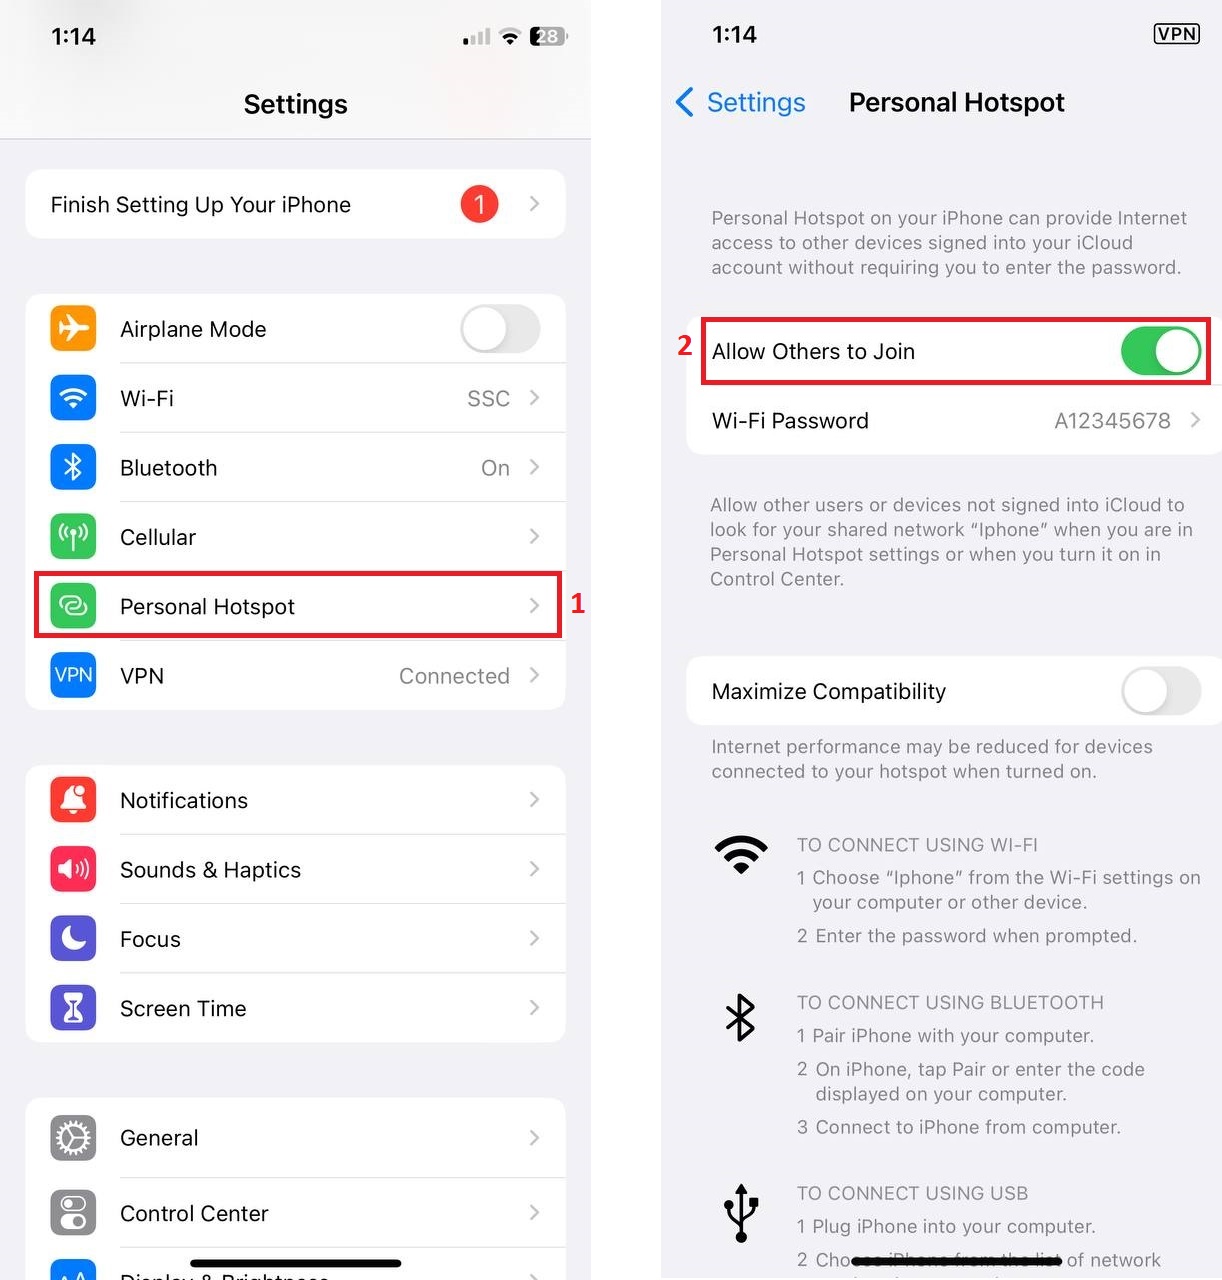
Enabling Wi-Fi Hotspot: Navigating to Settings
Step 3: Customize Your Hotspot Settings
Once you’ve enabled your Personal Hotspot, you can secure it with a password. To begin, tap on the “Personal Hotspot” option in the settings. Here, you can change the WiFi password by tapping on the “Wi-Fi Password” option, respectively. Ensure you create a strong password that isn’t easily guessable to enhance security.
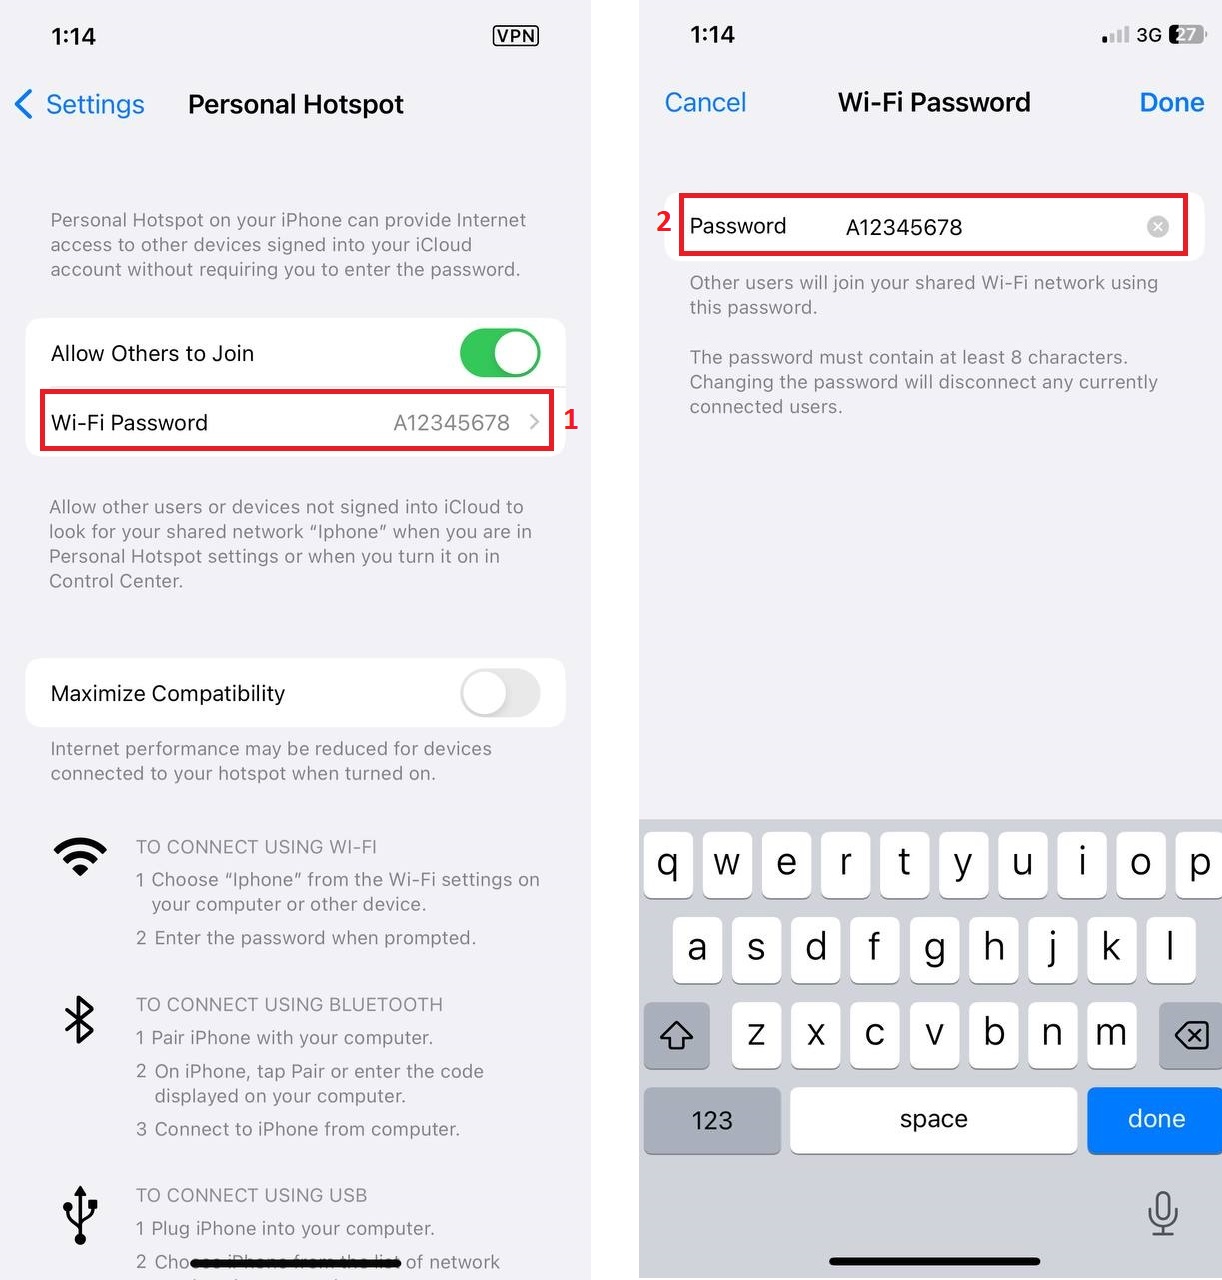
Establishing Personal Hotspot: Configuring Password and Security
Note: The name of the Wi-Fi hotspot is the name of your phone.You can change that from General -> About and tap on the Name and enter the name you want. Pay Attention, This is a general setting that changes your Phone Name.
Step 4: Connect Other Devices
Now that you’ve successfully set up your hotspot, it’s time to connect other devices, such as laptops, tablets, or other smartphones, to utilize the Wi-Fi connection. On your chosen device, navigate to its WiFi settings and look for the name of your iPhone hotspot. Select it from the list and enter the password you configured earlier. Once the correct password is entered, the device will connect to your iPhone’s hotspot, providing access to the internet.
Step 5: Monitor Data Usage (Optional)
Using your iPhone as a Wi-Fi hotspot can consume data from your cellular plan, so it’s crucial to monitor your usage. To do this, visit Cellular and scroll down. Here, you can see a list of active applications on your iphone along with the total amount of their Internet usage. Looking for the Personal Hotspot and check the value . If you want to see more details, tap on the Personal Hotspot to see how much of your internet has been used by each user connected to your hotspot.
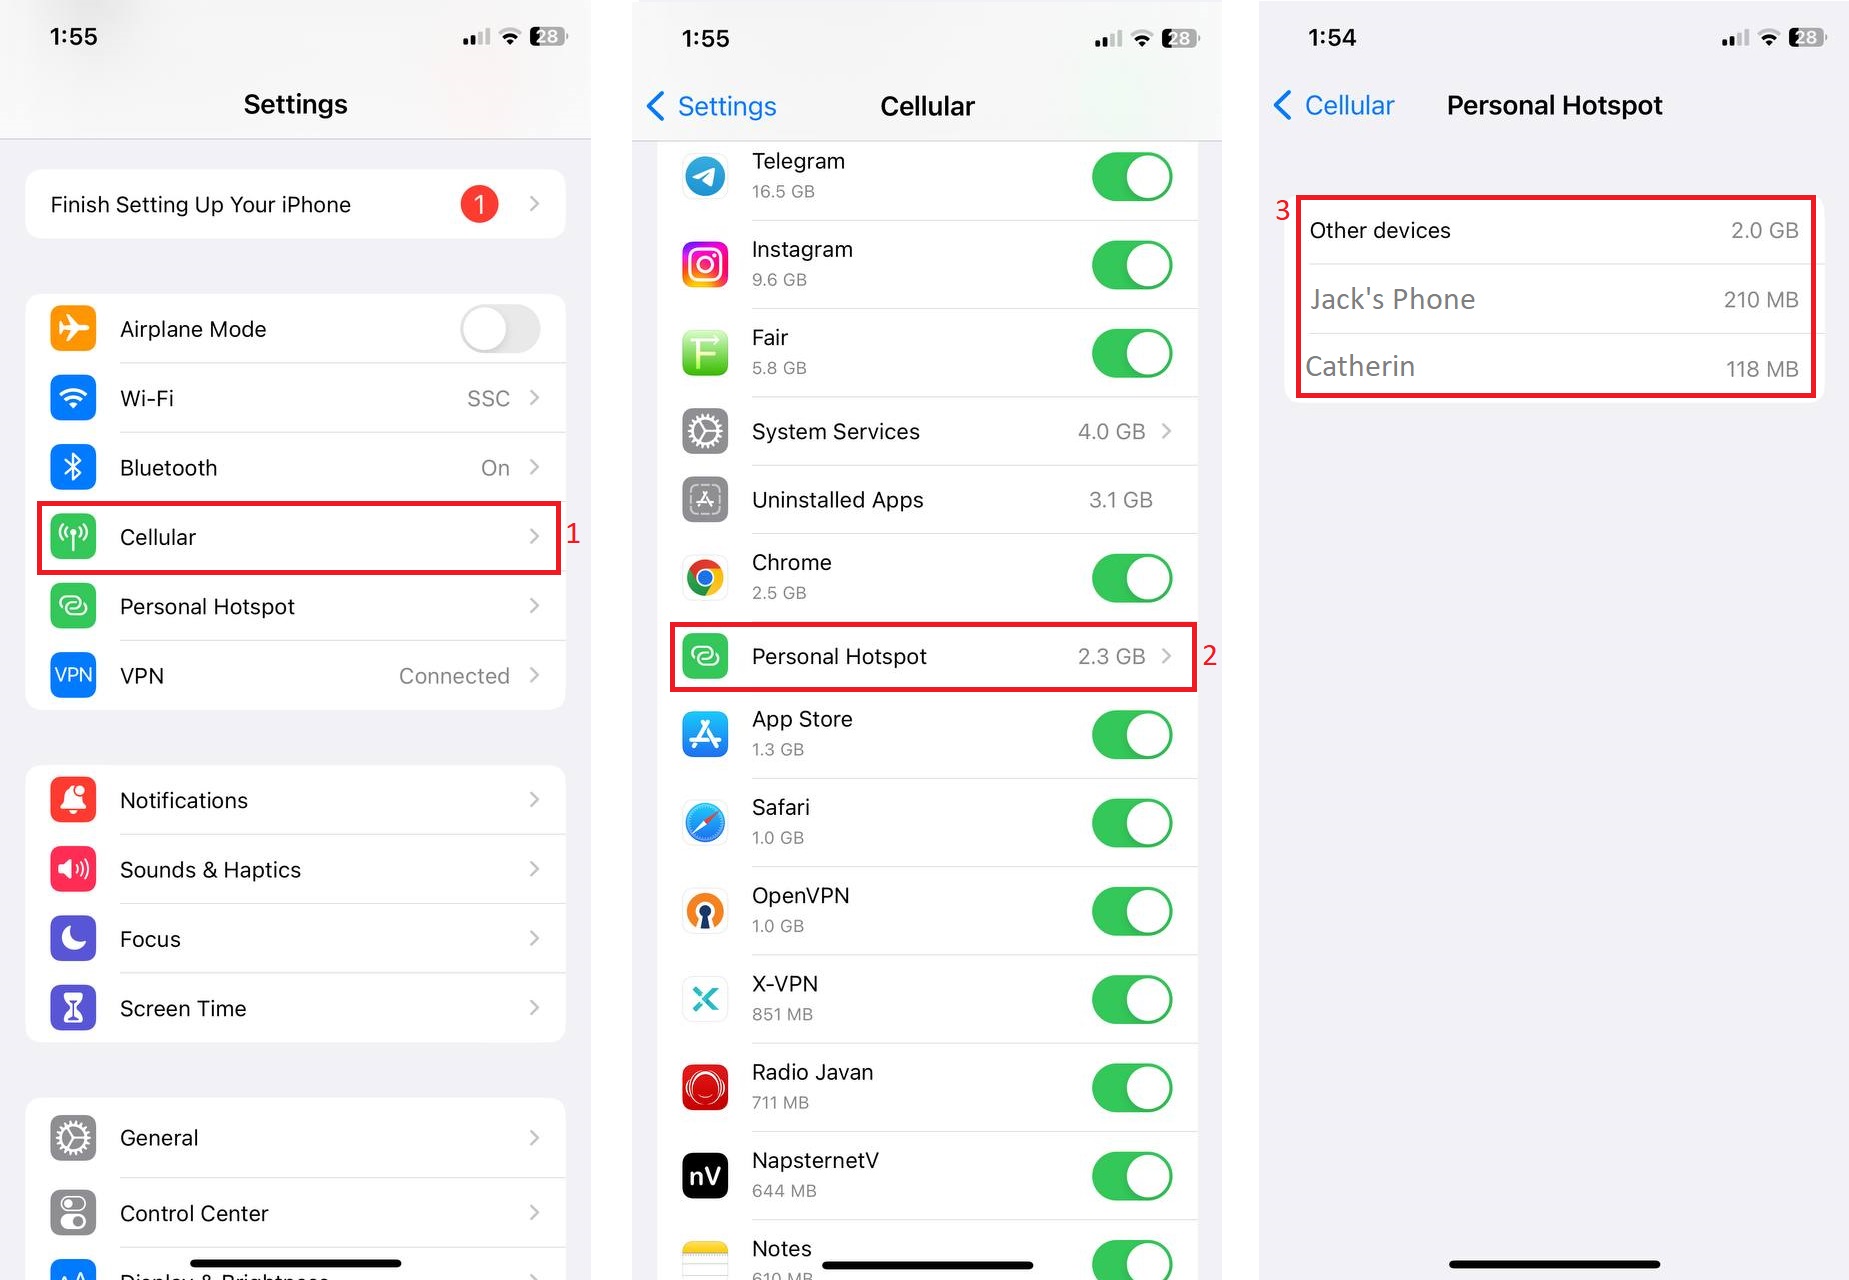
Mission Accomplished: Wi-Fi Hotspot Up and Running
Keeping track of your data usage will allow you to manage your usage effectively and prevent any unexpected charges from your service provider.
Conclusion
Setting up a Wi-Fi hotspot on your iPhone is a straightforward process that enables you to share your internet connection with other devices. Whether you’re on the go, unable to find a reliable hotspot, or just in need of a secondary connection for your devices, the Personal Hotspot feature on the iPhone has got you covered. By following the steps outlined in this guide, you can easily establish a secure and convenient hotspot, allowing you to stay connected whenever and wherever you need it.


