How to Secure WiFi Network
In today’s connected world, protecting our digital assets is very important. Our Wi-Fi networks act as gateways to our personal information and are a prime target for cybercriminals, which is why protecting Wi-Fi networks from unauthorized access is essential to our privacy as well as cyber security. In this post, we have explained the basic steps to increase the security of your home or workplace network.
Secure WiFi Router to Secure Wifi Network
To increase the security of the Wi-Fi network, we must secure the router. All the things that help to increase the security of your wireless network are inside the configuration panel of the router, so we carefully check all the things and make the necessary settings using the information of this post.
1. Change the Router’s Default Login Credentials
You need a username and password to enter the router’s configuration panel, which unfortunately is set to “admin” as both username and password by default. Since this information is available to everyone, let’s change this first. Here’s a detailed guide on why and how to change your router’s default login information. Read More : How to Access Router Settings?
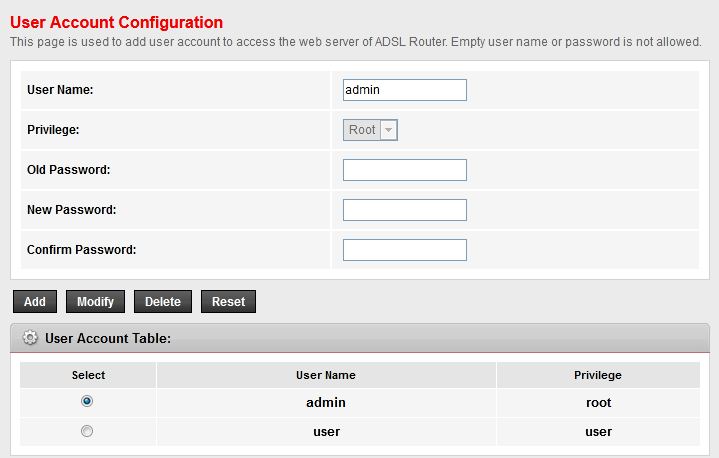
Changing the router’s default login credentials to a unique username and strong password is essential for protecting your network from unauthorized access.
Steps to Change the Default Login Credentials
- Access the Router’s Admin Panel:
- Open a web browser and enter your router’s IP address (usually 192.168.1.1 or 192.168.0.1) in the address bar.
- Enter the default username and password, usually found on the label on the back of the router or in the manual. Usually the default is “admin” for both fields.
- Navigate to the Administration Section:
- After logging in, find the Administration or Security Settings section. The location of this section may be different depending on the router model.
- Change the Username and Password:
- Look for fields related to changing username and password here. Then enter a new username and a strong and unique password.
- Keep in mind that a strong password must be at least 12 characters long and also contain a combination of upper and lower case letters, numbers and symbols.
- Save the Changes:
-
- After entering the new information, save the changes and reboot the router for the new settings to take effect.
Tips for Creating Strong Login Credentials
| Tip | Description |
|---|---|
| Use a Unique Username | Common usernames like “admin” or “user” are easy to guess, choose something unique. |
| Create a Strong Password | Use a combination of upper and lower case letters, numbers and special characters. Never use common words such as “mypassword” or “123456” that are easily guessed. |
| Regularly Update Credentials | It is better to periodically change your router login information. |
| Use a Password Manager | The password manager program is very useful and helps to manage your passwords. |
| Avoid Personal Information | Avoid using publicly available personal information such as dates of birth, names or generic phrases. |
| Length Matters | The longer the password, the harder it is to crack, make sure your password is at least 12 characters long. |
2. Change the Default Network Name (SSID)
All routers have a default network name (SSID, WiFi Name). Unfortunately, the default network name contains important information such as the brand and model of the router. This makes hackers find out what your device is and look for exactly the weaknesses of the same brand and model, this is very dangerous. Be sure to change the default Wi-Fi network name at the first opportunity to take an important step to secure your network.
Tips for Choosing a Secure SSID
- Be Unique: Choose a name that is not easily associated with you or your location.
- Avoid Personal Info: Do not include personal details such as name, address or phone number.
- Use Random Characters: Adding random letters and numbers can make your SSID more secure.
- Keep it Simple: Make sure the name is memorable and recognizable to you, but hard for others to guess.
Example of Secure SSIDs
| Example SSID | Description |
|---|---|
| SecureMyNet143 | Unique and non-personal |
| QuantumWifi537 | Random and hard to guess |
| Home-NetBase416 | Simple yet distinctive |
3. Change the Default Router’s IP address
All routers also have a default IP address that must be changed. Manufacturing companies usually use IP addresses such as 192.168.0.1 or 192.168.1.1 as the default IP address. To increase router security, change this address to a less common address.
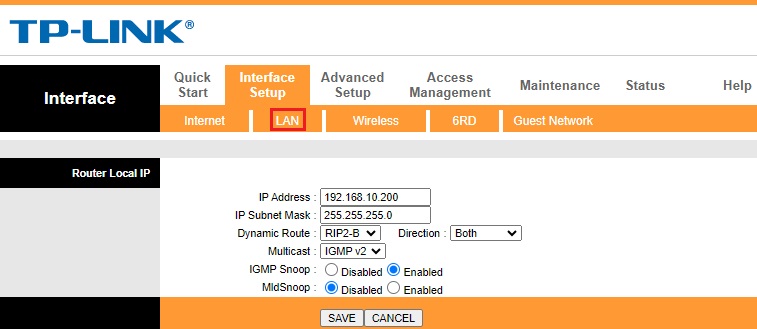
Changing the default IP address of your router adds an extra layer of security, making it harder for unauthorized users to locate and access your network settings.
Tips for Choosing a New IP Address
| Tip | Description |
|---|---|
| Use Private IP Ranges | Ensure the new IP address is within the private IP range (192.168.x.x, 10.x.x.x, or 172.16.x.x). |
| Avoid Common IPs | Choose an IP address that is not commonly used, such as 192.168.10.1 or 192.168.15.1. |
| Check for Conflicts | Ensure the new IP address does not conflict with other devices on your network. |
| Keep it Simple | Choose an IP address that is easy to remember, such as 220 or 100, but will not be guessed by others. |
Example of New IP Addresses
| Old IP Address | New IP Address |
|---|---|
| 192.168.0.1 | 192.168.100.10 |
| 192.168.1.1 | 192.168.200.200 |
| 10.0.0.1 | 10.0.1.100 |
4. Using Strong WiFi Password
One of the easiest ways for hackers to break into the network is to find the Wi-Fi password. If you choose a complex and strong password for Wi-Fi connection, the hacker cannot easily find it or guess it. As mentioned before, try to use a combination of letters, numbers and characters.
How to Create a Strong WiFi Password
Creating a strong WiFi password involves using a mix of characters and avoiding common phrases. Here are the steps to generate a secure password:
Tips for Creating a Strong WiFi Password
| Tip | Description |
|---|---|
| Minimum 12 Characters | Make sure your password is at least 12 characters long. Longer passwords are harder to crack. |
| Mix of Characters | Combine uppercase and lowercase letters, numbers, and special characters to make your password more complex. For example: Str0ngP@ssw0rd!2024. |
| Avoid Common Phrases | Avoid using information that can be easily guessed, such as names, dates of birth, or generic words such as “password” or “admin“. |
| Random Combinations | Create a password with random characters or use a password manager for generation. I agree that this is very difficult, but it is really important. |
| Change Regularly | Try to update your WiFi password periodically, every 3 months. |
| Avoid Reusing Passwords | Do not reuse passwords from other accounts or networks. Unfortunately, some users usually use the same password for all their services. |
Example of a Strong WiFi Password
| Password Type | Example |
|---|---|
| Weak Password | password123 |
| Strong Password | Str0ngP@ssw0rd!2024 |
5. Disable WPS
The WPS system is designed to simplify the process of connecting your devices to the Wi-Fi network. This system works in such a way that if the user has physical access to the router, he can connect to the network just by holding a hardware key and without having a password. This feature, along with its interesting application, is a big security challenge that makes it very vulnerable and penetrable. In my opinion, ignore its features and disable it.
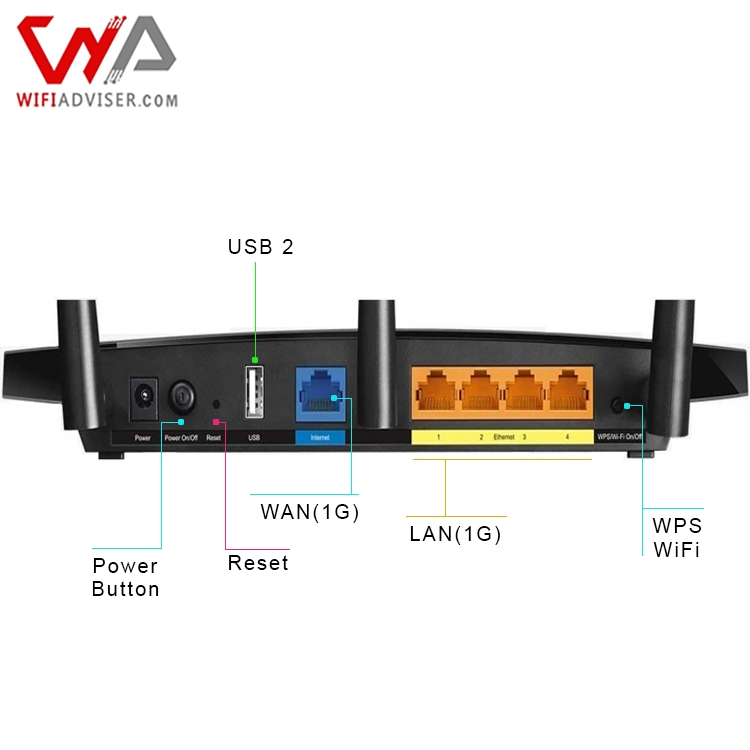
WPS Button is Located on The Back of The Router.
If your router’s WPS feature is enabled, hackers can simulate WPS operations with a special program and easily connect to your network.
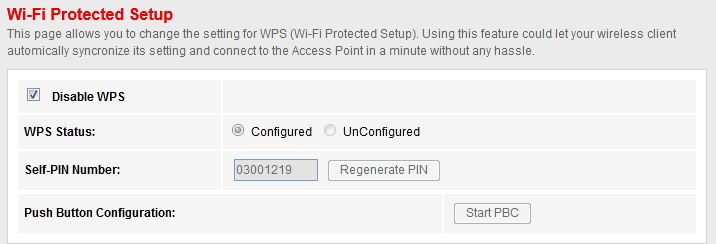
Disabling WPS on your router helps protect your network from vulnerabilities associated with WPS, ensuring a more secure WiFi connection.
How to Disable WPS
| Step | Description |
|---|---|
| Log into Admin Panel | Enter your router’s IP address in a web browser and log in. |
| Find WPS Settings | Navigate to Wireless Settings or Advanced Settings to find the WPS settings. |
| Disable WPS | Turn off the WPS feature by unchecking the box or toggling the switch, then save the changes. |
6. Turn Off the Remote Access
Remote access allows you to manage your router settings from anywhere over the Internet. This feature, along with the interesting and convenient application it brings, can also have significant security risks. Usually these services have many bugs and attackers always know them.
In order to turn off this feature, enter the router’s management panel and look for the section called remote access and disable it.
7. Turn on The Firewall
A firewall acts as a barrier between your network and the Internet, blocking unauthorized access and protecting your devices from malicious attacks. Enabling this service creates an additional layer of security for your network.
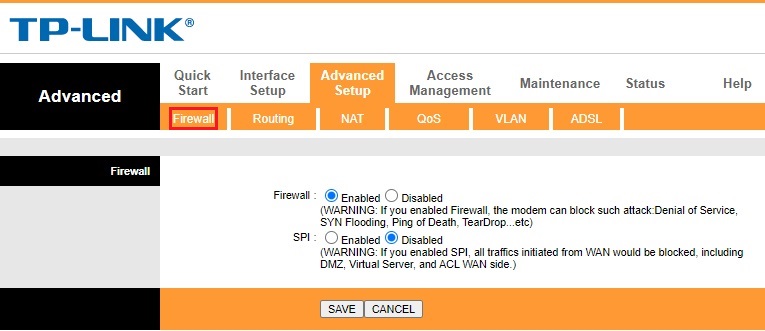
Enabling the firewall in your router’s admin panel provides an essential layer of security, protecting your network from unauthorized access and malicious attacks.
- Block Unauthorized Access:
-
- Firewalls monitor all incoming and outgoing traffic and allow only legitimate traffic to pass. This service detects all unauthorized traffic and prevents them from accessing the network.
- Prevent Malware and Viruses:
-
- An active firewall can prevent malware, viruses and malicious software from entering your network.
- Control Network Traffic:
-
- Firewalls allow you to set rules for which types of traffic are allowed or denied, giving you greater control over your network security.
8. Disable Router DHCP Server
Each device needs an IP address to connect to the network. In order to facilitate this process, DHCP service is used, which automatically assigns an IP address to each device. By disabling this feature and manually managing IP addresses, you’ll gain more control over your network and reduce the risk of unauthorized access.
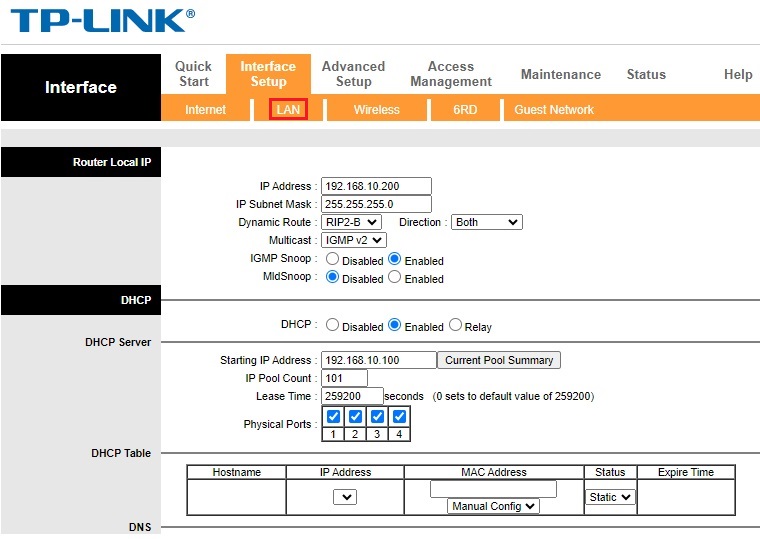
Disabling the DHCP server on your router enhances network security by allowing you to manually assign IP addresses, ensuring only authorized devices can connect.
How to Disable DHCP Server
| Step | Description |
|---|---|
| Log into Admin Panel | Enter your router’s IP address in a web browser and log in with your credentials. |
| Find DHCP Settings | Navigate to Network section , then find the DHCP settings section. |
| Disable the DHCP Server | Here, you can turn off the DHCP server or change the IP Address assignment option. |
| Manual IP Assignment | After disabling this service, you need to set manual IP address for all devices. |
9. Mac Filtering
One of the best ways to secure a Wi-Fi network is to use a MAC filtering service. Each network card has a unique 16-bit address written on its chipset. This fixed address is the main basis of network communication. The working method of MAC filtering service is that we enter a list of allowed MAC addresses in the router so that only those addresses are served.
Why Use MAC Filtering?
- Prevent Unauthorized Access:
-
- MAC filtering restricts network access to specific devices, which can’t be connected even if someone knows your WiFi password.
- Enhanced Control:
-
- This feature provides an additional layer of control over your network, allowing or denying devices based on their MAC addresses.
- Better Network Management:
-
- By knowing exactly which devices are connected to your network, you can manage and monitor network traffic more effectively.
- Increased Security:
-
- MAC addresses are unique to each device, making it a secure way to manage and secure device connections.
How to Enable MAC Filtering
| Step | Description |
|---|---|
| Log into Admin Panel | Enter your router’s IP address in a web browser and log in with your credentials. |
| Find MAC Filtering Settings | Navigate to the MAC filtering or wireless settings section to locate the configuration. |
| Enable MAC Filtering | Turn on MAC filtering by checking the box or toggling the switch. |
| Add Authorized Devices | Enter the MAC addresses of the devices you want to allow access to your network. |
| Save the Changes | Save the changes and reboot your router if necessary. |
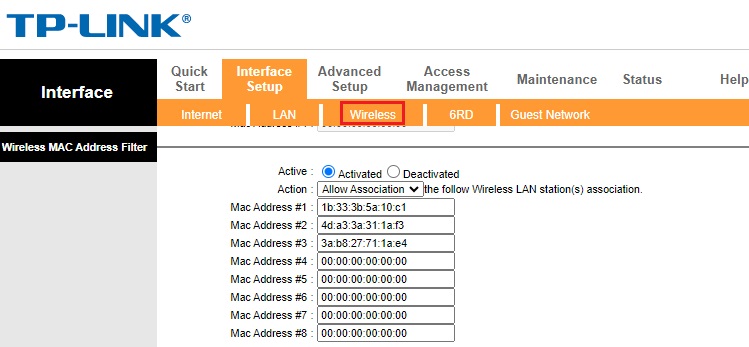
Enabling MAC filtering on your router allows you to specify which devices can connect to your network, enhancing security by restricting access to authorized devices only.
10. Keep the Router Firmware up to date
One of the most important points that manufacturers pay attention to in their updates is the increase in security features. Usually, every once in a while, they provide a new firmware that, in addition to fixing other problems, updates the router to deal with new security risks.
Why Update Router Firmware?
|
Reason |
Description |
|
Enhanced Security |
Firmware updates patch known security vulnerabilities and protect your network from potential threats and exploits. |
|
Improved Performance |
Updates often include optimizations that increase the speed, stability, and overall performance of your router. |
|
Compliance with Standards |
Ensures your router is up-to-date with the latest industry standards and protocols, improving compatibility with new devices and technologies. |
|
Enhanced User Experience |
Improvements and new features provided by firmware updates can lead to a better user experience and more efficient network management. |
11. Secure Physical Access to the Router
Securing physical access to the router is very important, if the device is accessible to unauthorized users, it may be restored to factory settings or easily connected to it using the WPS key. Keep in mind that even if the user does not connect to the device, he can disconnect the network and power cables.
Securing Physical Access
|
Step |
Description |
|
Choose Secure Location |
Place the router in a locked room or on a high shelf to prevent unauthorized access. |
|
Avoid Public Areas |
Keep the router away from public places to reduce the risk of tampering. |
|
Restrict Access |
Limit physical access to the router to only trusted people. |
|
Label and Secure Cables |
Clearly label and secure all cables connected to the router. |
Conclusion
Previously, hackers had to have special knowledge to penetrate networks, but today, with the increase of hacking programs in mobile and Windows versions, simple users with minimal network information can cause trouble for your network. Keep in mind that Wi-Fi network security is a multi-factor process that does not secure the network until all of them are done.